
documentation


This tutorial page shows you how to use the VisionLib Auto Initialization feature.
Note: This feature is still beta, and might be modified in upcoming releases.
In the past, most applications that were made with VisionLib Model Tracking started with a fix initial pose, to which the user had to align the physical object. There was still the possibility to save init data during the session and load it again, which enabled the user to gain some kind of static auto initialization.
While this workflow is still available, it requires to collect such data manually in advance. It is not stable over time and is not robust against any other device rotation, object movement or changing surroundings compared to the recording.
With the new auto initialization, you can define your working area - which is called WorkSpace - and enable an initialization from any point in this area. Theses poses can be "trained" at the start of the application.
This way, you don't need to align the camera view to a certain pose anymore and start the tracking much faster and a lot easier: simply point your camera at the object and it will be recognized and tracked.
Note: The AutoInit feature, as described here, is a pure on-device feature and does not connect to any learning service outside of the device. It does not send your data anywhere.
AutoInit might get performance-intensive and can thus cause problems on older hardware. We recommend using hardware from 2018 or newer.
Note: Test your tracking target with the SimpleModelTracking first and adjust the tracking parameters accordingly. Only proceed with this experimental feature as soon as the standard tracking is working fine.
You can find an example of how to use AutoInit in the AutoInitTracking scene which is located in VisionLib Examples/ModelTracking/AutoInit after importing the VisionLib.SDK.Examples-Unity.unitypackage.
To add AutoInit to your own scene, right click on the GameObject that you are using as an augmentation of your tracking target and then choose VisionLib > AutoInit > Create Simple WorkSpace. This will create a VLSimpleWorkSpace with the selected GameObject as its destination. It will also create a VLWorkSpaceManager GameObject if it doesn't exist yet.

If you like, you can now remove the VLInitCamera from your scene, or keep it to provide a "fallback" init pose.
There are two types of WorkSpaces, the Simple- and the AdvancedWorkSpace.
We strongly recommend to use the SimpleWorkSpace and only choose the AdvancedWorkSpace if the degrees of freedom given by the SimpleWorkSpace do not allow you to model your workspace close enough.
Both the Simple- and the AdvancedWorkSpace share some general settings:
| Setting | Description |
|---|---|
| UsedCamera | VisionLib will use the field of view of this camera when creating renderings of your model. This way, the visualization in the editor matches the actual rendering in the VisionLib SDK. The camera reference is also used for stepping through the positions with the "Switch through Poses" slider. |
| Up Vector | The upright direction of your model. If the orientation is aligned with the unity world, choose (0,1,0). |
| Destination Object | GameObject containing your tracked model as a mesh. |
| Display View Direction | If enabled, dotted lines will be drawn in the Scene view between all origin and destination points. |
| Switch through poses | Use this slider for a Game view preview of the poses that you defined for the WorkSpace. This will set the transform of the camera assigned to "UsedCamera". |
The SimpleWorkSpace allows you to select the angles from which to initialize your tracked model using the settings that are summarized in "Sphere Constraints".
The values are essentially the same as for the Sphere of the AdvancedWorkSpace (see below) - and can also easily be manipulated using the green and red handles in the Scene view.
VLSimpleWorkSpace GameObject to select it and focus it in the Scene view.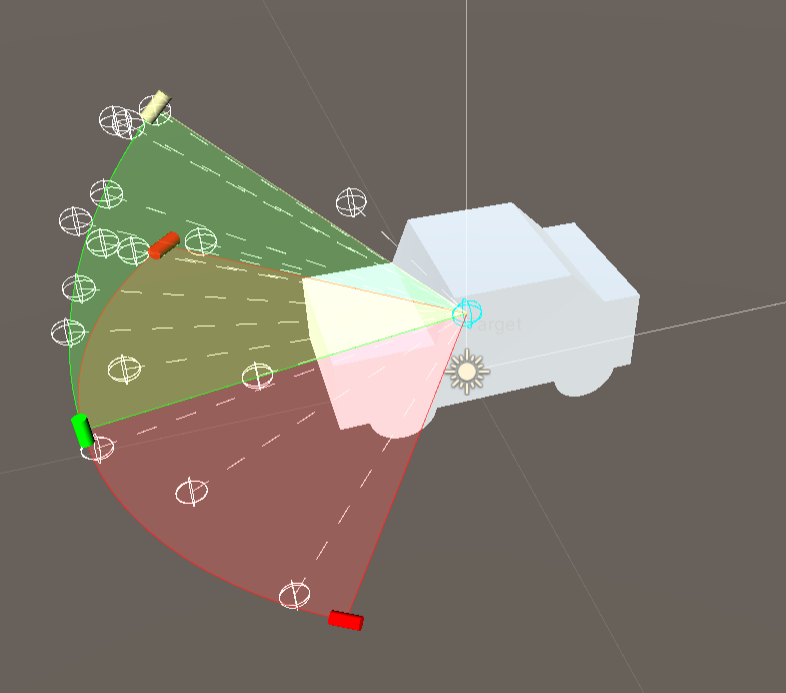
The radius of the sphere will be adjusted automatically to fit the bounds of the destination object and the field of view of the camera.
Note: To improve recognition results, it is advisable to set the field of view of your camera to a value that roughly matches the one of the physical camera you will use for tracking later.
The AdvancedWorkSpace introduces more degrees of freedom to model the view points you want to cover with the AutoInit. Geometry primitives of different types can be used to describe both the origin and the destination.
When creating an AdvancedWorkSpace via context menu (or using the prefab VLAdvancedWorkSpace), the created GameObject will contain two children - Origin and Destination. Both will come with a WorkSpaceGeometry component attached.
Each WorkSpaceGeometry produces a set of points. The AdvancedWorkSpace will then generate views by "looking" from all origin points to all destination points.
A WorkSpaceGeometry can be one of four primitives, that can be selected with the Shape attribute of that component.
| Parameter | Default Value | Function |
|---|---|---|
| Radius | 1 | Radius of the sphere |
| Detail Level | 0.1 | Amount of Pose Points |
| Vertical Angle Constraints (Polar): | ||
| Polar Start | 0° | Vertical starting angle |
| Polar Length | 90° | Vertical sweep angle size |
| Horizontal Angle Constraints (Azimuthal): | ||
| Azimuth Start | 0° | Horizontal starting angle |
| Azimuth Length | 360° | Horizontal sweep angle size |
The default origin geometry of the AdvancedWorkSpace is set to a half sphere, with PolarStart at 0° and PolarLength at 90°.
This is a good preset for objects that stand or lie on a surface and should be initialized from above. Other custom variations (e.g. spherical triangle) can be achieved by constraining the horizontal angles as well.
| Parameter | Default Value | Function |
|---|---|---|
| Length | 1 | Horizontal extend of the plane |
| Width | 1 | Vertical extend of the plane |
| Step | 3 | Number of sample points in each dimension |
| Parameter | Default Value | Function |
|---|---|---|
| Length | 1 | Extend of the line |
| Step | 3 | Number of sample points |
If the WorkSpace geometry configuration is adequate, place it over the tracking target via Unity's transformation component. The WorkSpace and its origin & destination geometry can be translated and rotated.
Note: The scale of the WorkSpace and its geometries cannot be changed at the moment! Always keep it at (1,1,1).
Important: Keep in mind that the pose amount in the WorkSpace component depends on the detail level or step count that you defined in the geometry. As a rule of thumb, a higher amount of poses enables more initialization points but also increases the initial pose learning time and might affect the performance negatively. A decreased performance can overall lead to a slower initialization!
That said, it is always better to only set up initialization areas that are actually needed.
Here you can either use the Destination GameObject, which is a child of the VLWorkSpace, and adjust it similar to how you used the Origin. In most cases, it will be enough to use only one target point.
Or you can simply drag your tracking target object from the hierarchy inside this public parameter. In that case, the geometric center of the GameObject will be used as a single target point.
Note: When using a GameObject as destination, the transform of this object must lie in the origin (0,0,0) of the scene.
Note: If a destination point shares its position with an origin point, it won't be possible to create a corresponding initialization pose.
To preview the poses, that you generated by setting the origin geometry and destination object, you can use the following:
See the gizmos in Scene view:
VLWorkSpace is selected.Display View Direction parameter of the WorkSpace component to show dotted lines from origin to destination points in Scene view. To keep the scene tidy, they will only be drawn if the number of poses is smaller than a fix maximum.Preview poses in camera:
WorkSpace component to preview the generated poses in your game view (make sure you can see the game view window in Unity).The VLWorkSpaceManager is mandatory and aggregates one or more VLWorkSpace definitions to process them during runtime.
It contains the following public parameters:
As always, reference your used tracking configuration (.vl file) and license in the TrackingConfiguration component of the VLTracking object. To enable AutoInit, insert "autoInit": true in your tracking configuration:
Note: You can delete the "initPose" section from your tracking configuration, or keep it to provide a "fallback" pose.
The last step is to activate the pose learning. Do that either by using the autostart option in the WorkSpaceManager(which is active by default), or by calling the following function e.g. on a button click or from your script: WorkSpaceManager.LearnWorkSpaceInitData()
Wait some seconds (activate the progress bar in the WorkSpaceManager to show the learning progress) until all poses have been trained.
Now you can point your camera to the physical object from a direction that is included in the VLWorkSpace that you defined and it will be tracked.
The footprint of the learned data is quite small (several 100kB) and will be cached in local-storage-dir:/VisionLib/AutoInit/initData_filename.binz. The filename is a combination of the hash of your WorkSpace definition and model definition.
You only need to "train" the WorkSpaces once. When you call the learning command a second time with the same WorkSpace definition and model configuration (including transforms and model-constellation), the cached file will be used instead of relearning.
To stop AutoInit or reset its learned data on runtime, you need to call ModelTracker.ResetInitData(). In the example scene, the Clear button is using this command.
This will not delete the cache, which thus can be loaded again without relearning (e.g. by pressing the Learn button in the example scene).
If you want to force a relearning of the poses, you will need to remove the .binz file from the local storage of your device.
AutoInit is not working as expected? Check the following:
You can add some optional parameters for AutoInit by inserting it as a section in your tracking configuration:
The following optional parameters are available:
| Parameter | Type | Default Value | Function |
|---|---|---|---|
| laplaceThreshold | float | laplaceThreshold of ModelTracker * 4 | See ModelTracker laplaceThreshold |
| normalThreshold | float | normalThreshold of ModelTracker | See ModelTracker normalThreshold |
| writeDebug | bool | false | If set to true, the VisionLib SDK will write images of the renderings (that are an intermediate step when learning features for AutoInit) to the writeDebugPath. The debug images are especially helpful to understand the effects of laplaceThreshold and normalThreshold to the edge extraction. |
| writeDebugPath | string | "local-storage-dir:/VisionLib/AutoInit/DebugImages/EdgeImage_" | Path for writing debug images. The default path writes images to local-storage-dir:/VisionLib/AutoInit/DebugImages_[n]/EdgeImage_[m].png |
| cacheDir | string | "local-storage-dir:/VisionLib/AutoInit/" | The directory in which the cached AutoInit learning results will be stored. |
| maxImageSize | int | 640 | Maximum side-length of the image used for AutoInit. If this is smaller then the tracking image, VisionLib will downscale the image for auto init. Increasing this value will allow to initialize from larger distances. |
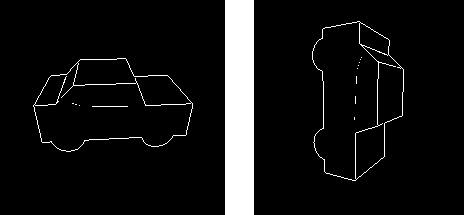
When troubleshooting, it might be helpful to activate "writeDebug":true in your tracking configuration.
Have a look at the generated images. Your object should be fully visible and lie in the center of the image. If not, adjust your WorkSpace parameters in Unity.
If the white lines in the images are dotted or messy in some way, you can modify the laplaceThreshold and normalThreshold of the autoInit section to get better results. Usually you will need to take a much higher float value than for the corresponding parameters of the model tracker. If the debug images have clear, tidy lines, the set parameters are fine.
See an example for debug images with good and bad lines below:
If your written debug images show your model rotated, you should adjust the up vector of your WorkSpace.
Currently, AutoInit works well on objects that are initialized in a long shot view. Thus, smaller objects which fit into the camera view completely will work much better.
You can check if the object is fully visible in the camera preview.
Close-Up object initialization is still under development, but might already work with the tools provided in this version.
Note: On HoloLens 2, it can make a great difference to set "fieldOfView: narrow" when working with small objects. For more details on that parameter, please refer to HoloLens Optimizations.
This is a legit question. Anyway, initializing the tracking from all views might not be necessary and restricting the working area will help VisionLib to find the object more reliably.
Also, you should prevent the definition of views, from where the object is not even recognizable or distinguishable by its form: Initializing a cell phone from the side will probably result in detecting a pencil as well.
So please consider this when defining WorkSpaces.
Please contact us and we can help you find a way to integrate WorkSpaces into your product.
We are happy if you give us feedback or even provide us image sequences of objects being initialized.
If you have issues or suggestions on how to enhance or integrate this feature, please do not hesitate to contact us on request@visionlib.com.