
documentation


This tutorial explains how to set up VisionLib object tracking when using AR Foundation in a Unity scene. You should already be familiar with setting up VisionLib in a Unity scene without AR Foundation, as described in the UnitySDK Quick Start.
Note: The ARFoundation support requires a license file containing the AllowInjectingImage feature.
AR Foundation is currently only supported on Android and iOS. Our implementation has been tested on Android 10, Android 11 and Android 12, as well as on iOS 13, iOS 14 and iOS 15.
VisionLib.SDK-Unity-X.Y.Z.tgz and Extensions/VisionLib.SDK.ARFoundation-Unity-X.Y.Z.tgz from the in the current VisionLib.SDK.Unity release. For more details and considerations regarding VisionLib Packages, see VisionLib SDK Packages.Extensions/VisionLib.SDK.ARFoundation.Examples-Unity.unitypackage.Assets/VisionLib ARFoundation Examples/Scenes/.Adding VL Tracking to an Existing AR Foundation Scene).StreamingAssets/VisionLib/TrackingConfiguration component of the VLTracking GameObject in the scene.Scenes in Build in the build settings.Configuring a Project for Building to Your Target Platform.Note: AR Foundation is a package in active development with new features being released in rapid succession. Support for Unity 2019 was dropped in AR Foundation 4.2. Using Unity versions newer than 2019 is therefore recommended for AR Foundation projects.
You will encounter Gradle errors when attempting to deploy any Unity project containing VisionLib.SDK to Android with Unity 2019. You must use Unity 2020 instead (see our System Requirements).
Note: For improved compatibility with different ARKit XR Plugin versions, we strongly recommend using Unity 2019.4.15f1 or newer. For specifics on the compatibility of the ARKit XR Plugin with different Unity versions, please refer to Unity's Documentation for your desired ARKit XR Plugin version. The following instructions were tested with Unity 2019.4.31f1 and its verified version of the ARKit XR Plugin (2.1.19).
2.1.18 to the verified version. Before this manual update, you might not see AR Foundation listed in the Package manager if it is set to Packages: In Project. Switching to Packages: Unity Registry will show you that AR Foundation 2.1.18 is present. You can manually update from there.File > Build Settings select iOS and click on Switch Platform if it is not already selected.Edit > Project Settings > Player > Other Settings:Camera Usage Description to an arbitrary string, e.g. Augmented Reality. Use the purpose you want your user to see when they are asked to grant camera permission.Target minimum iOS version to at least 11.0.Architecture to ARM64.Edit > Project Settings > XR Plugin Management, install the XR Plugin Management.ARKit XR Plugin by checking the ARKit toggle in XR Plug-in Management > iOS Settings > Plug-in Providers.Perform these setup steps to fix the compiler errors encountered during the initial scene setup:
2.1.18 to the verified version. For Unity 2020.3 LTS, this is currently 4.1.10.Packages: In Project. Switching to Packages: Unity Registry will show you that AR Foundation 2.1.18 is present. You can manually update from there.
ENABLE_ARFOUNDATION_4 to the list of scripting defines under Edit > Project Settings > Player > Other Settings > Script Compilation > Scripting Define Symbols and press Apply. Do this for your build target platform (Android or iOS). You do not need to set this for the editor. The compiler error will disappear after switching your project's build target to your target platform.File > Build Settings select Android and click on Switch Platform if it is not already selected.Edit > Project Settings > Player > Other Settings make the following changes:Vulkan is not the only enabled Graphics API, as Vulkan is not supported by ARCore. You will encounter the build error shown below if you attempt to build with Vulkan as the first option. You can either delete Vulkan from the list of Graphics APIs, replace Vulkan with another option (usually OpenGLES3) at the top of this list or enable Auto Graphics API. All three approaches will work. The former two options will enforce the exclusive use of the first API in the list. For further reading on the graphics API settings, refer to Unity's documentation on this topic. Minimum API Level to "Android 7.0 'Nougat' (API Level 24)". Otherwise you will encounter the following error: Scripting Backend to IL2CPP, since Unity will not build for 64 bit ARM architectures using Mono.ARM64 in Target Architectures.ARMv7 to save build time and storage space.Enable ARCore under Edit > Project Settings > XR Plug-in Management > Android Settings > Plug-in Providers.
Edit > Project Settings > XR Plug-in Management > ARCore set Requirement and Depth to "Optional". If you do not set Requirement to optional, you will encounter this error when attempting to build: 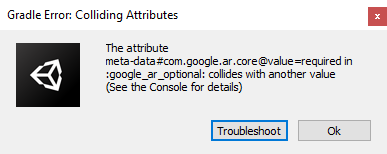
File > Build Settings select iOS and click on Switch Platform if it is not already selected.Edit > Project Settings > Player > Other Settings set the Camera Usage Description to an arbitrary string, e.g. Augmented Reality. Use the purpose you want your user to see when they are asked to grant camera permission.ARKit XR Plugin by checking the ARKit toggle in XR Plug-in Management > iOS Settings > Plug-in Providers.To enable VisionLib object tracking in an existing AR Foundation scene, select Game Object > VisionLib > Add XR Tracking. This will add all necessary GameObjects and Components under a parent object called VLTracking to your scene. It will also try to connect them automatically to the AR Foundation GameObjects.
Once the VLTracking GameObject is created, set your tracking configuration in the public parameter of the object's Tracking Configuration component.
Adjust the Transform of the VLInitCamera, so that the camera is pointing to the tracking target from the point that should be used to start tracking from.
Finally, you have to set the Content property of the XR Tracker component of the VLXRTracker to the GameObject that should be placed as an augmentation on the tracked object. The example uses the Scene Content GameObject for that purpose.
In the AR Foundation Example, we use the tracking configuration in StreamingAssets/VisionLib/Examples/ARFoundation/ModelTracking/ARFoundationModelTrackingConfiguration.vl. You can use this as a starting point for your own configuration file according to UnitySDK Quick Start. Make a separate copy of the file instead of modifying the existing file. This prevents issues from arising upon updates to new versions of VisionLib.
Set the path to your new tracking configuration file in the Tracking Configuration component in your scene. You will find this under VLTracking > Tracking Configuration.
Since Unity sets the position of the AR Foundation camera in meters, your model also has to be scaled accordingly. Also set the metric to "m" in your tracking configuration file.
The components that connect AR Foundation with VisionLib are placed on the GameObject called VLXRTracker.
The parameters have the following effects:
Max Tracking FPS to a lower value - or increase it to trigger object tracking more frequently.Use Pose From Tracking Config is selected, the initial position will be read from the tracking configuration file instead of the VLInitCamera.Keep Upright is disabled, the initial position of the tracking content will not be geared to the world up vector.Smooth Time is the time in seconds which it takes the tracking content to go to the position of the object tracking result. Higher values will make the transitions smoother but the updates will be less immediate.Testing AR Foundation scenes in the editor is inherently not possible with Unity out of the box. You can use the third-party plugin AR Foundation Remote from the asset store for this purpose. The specifics of using AR Foundation Remote with VisionLib are covered in AR Foundation Remote Plugin Setup (Beta).