
documentation


Tracking with the VisionLib SDK also works on Microsoft HoloLens. This tutorial will show you how to use and customize the HoloLens example scenes of the VisionLib SDK in Unity.
For more information on how to optimize your VisionLib HoloLens Tracking, please refer to HoloLens Optimizations.
Note: It is not possible to remote control the HoloLens from Unity when using VisionLib at the moment. You have to deploy your application using Visual Studio to test the tracking properly.
Please make sure you have installed all required tools and adjusted the settings for HoloLens and Unity Development.
At first, there are some adjustments of the Unity project needed.
vlUnitySDK.unitypackage into a new Unity project.Assets/StreamingAssets/VisionLib.VisionLib/Examples/ModelTracking/Simple or VisionLib/Examples/PosterTracking/ScenesFile/Build Settings):Add Open Scenes buttonSwitch PlatformARM (in Unity 2019 you are able to choose ARM64 to improve performance) 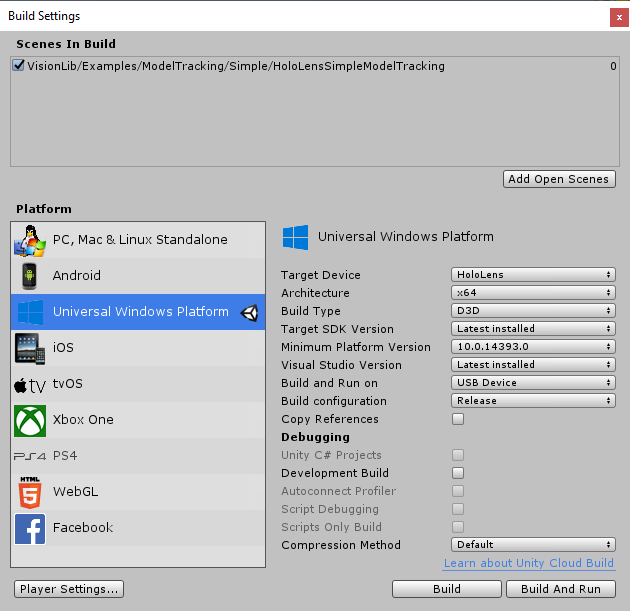
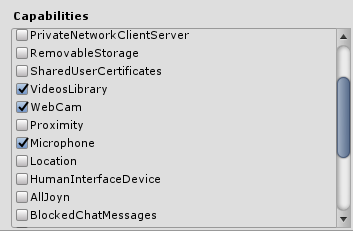
Edit/Project Settings/Player):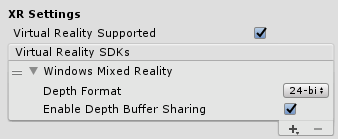
If you want to use the VisionLib mini car model or the default leaves poster, you can skip to the Deploy on HoloLens section below.
If you are using your own model, we recommend to try out the general smartphone / tablet tutorials first, to test if your poster or 3D model works well.
Important: For HoloLens scenes, the metric of the provided 3D model is very important. You have to specify the units used in your model file in the metric attribute in the parameters section of the tracker. If the 3D model is scaled in a different metric, the interaction between the VisionLib SDK and HoloLens does not work properly. This is crucial because the distance of the object to the camera will be deduced from the specified size of the model. If you are unsure about the metrics of your 3D model, please see vlUnitySDK_UnderstandingTrackingParameters for help.
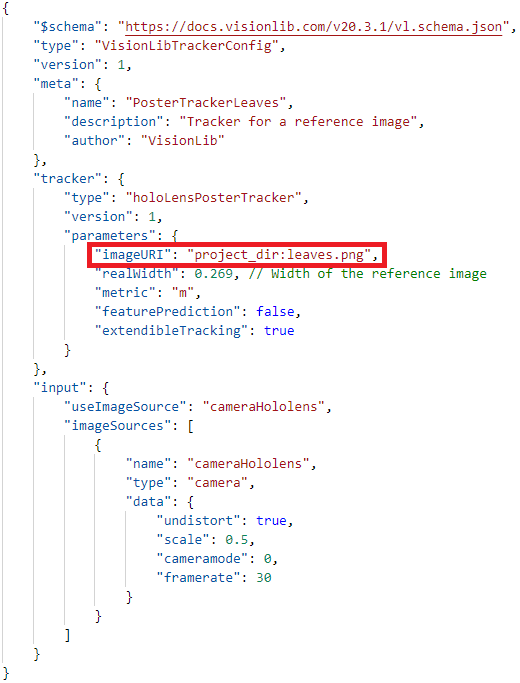
StreamingAssets/VisionLib/Examples/PosterTracking folder of your project.At the same location, make a copy of HoloLensPosterTracker.vl and adjust it:
a) Rename the file accordingly.
b) Open it with a text editor and change the attribute imageURI from leaves.png to the filename of your own image (e.g. "test.jpg").
Retain project-dir: in front of the name.
c) Adjust the attribute realWidth according to the physical size of your poster in meters. The default value matches ISO A4 (210 mm x 297 mm).
VLTrackingConfiguration component of the VLTracking GameObject.Poster_Quad (as a child of SceneContent/Poster) in the hierarchy and enter the scale of your physical poster in meters in the transform component of the GameObject.Materials folder. Select the mat_Poster_Debug material in VisionLib/Examples/Common/Materials in Unity's project panel and change the Albedo map to your image. Poster_Quad. 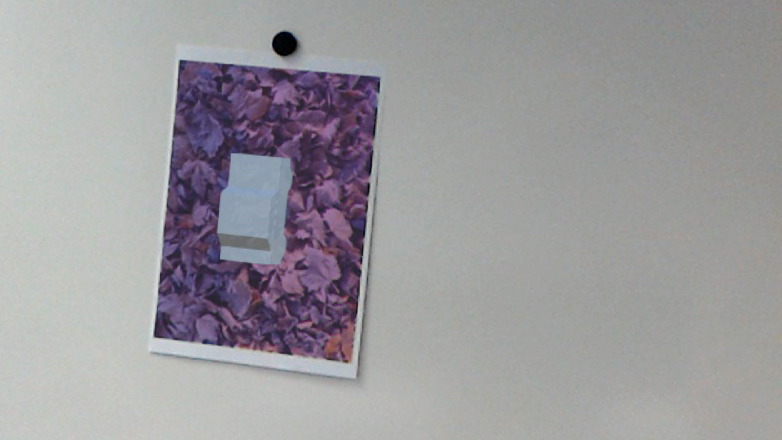
Poster_Content GameObject.StreamingAssets/VisionLib/Examples/ModelTracking of your project.carHoloLens.vl, open it with a text editor, and change the attribute modelURI to the filename of your own model (e.g. "tutorial.obj"). Retain project-dir: in front of the name.VLTrackingConfiguration component of the VLTracking GameObject.Models folder of your Unity project. Drag it from the project panel into the hierarchy of your scene as a child of the GameObject SceneContent.VLHoloLensInitCamera. Hint: Adjust your scene view and press GameObject/Align With View while the VLHoloLensInitCamera is selected to transfer the parameters of your scene view to VLHoloLensInitCamera.Essential: In VLTracking/VLHoloLensTracker the SceneContent GameObject is referenced as the Content attribute. Only the GameObject, which is referenced as Content will be positioned (and thus displayed) correctly in the application. So - as an alternative to drop your model as a child of the SceneContent GameObject, you can also drop it somewhere else. If you do so, you also have to adjust the Content attribute in VLTracking/VLHoloLensTracker to your new GameObject.
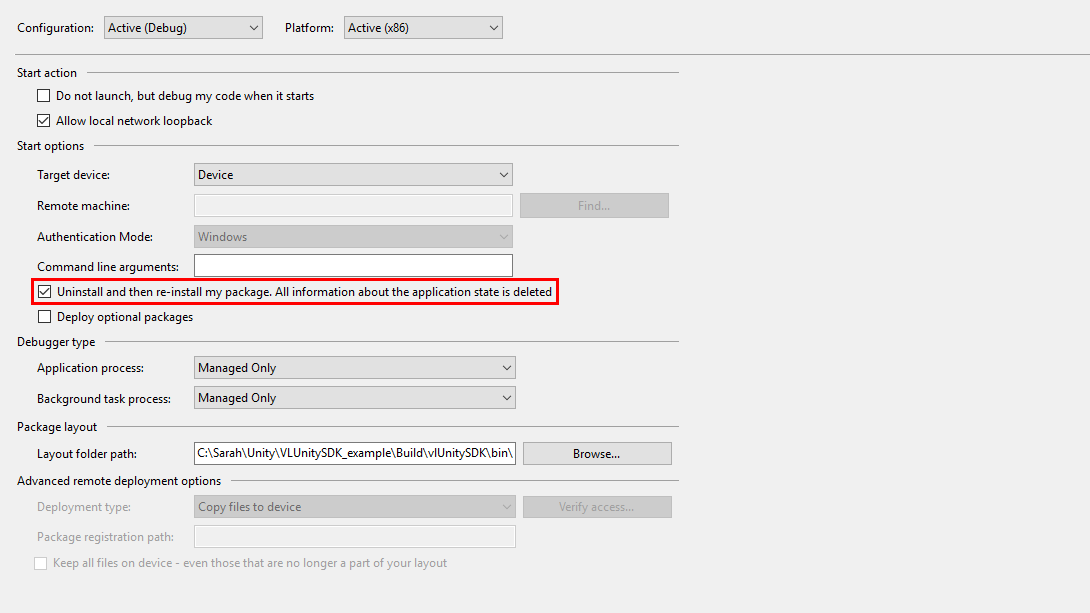
Build button in the File/Build Settings window and select a folder for the HoloLens deployment.*.sln) in that folder.Release or Debug and x86 (on HoloLens 2 to ARM / ARM64) as seen below.Local Machine to Remote Machine (deploy via Wi-Fi) or Device (deploy via USB connection).If you choose Remote Machine, you will be asked to enter the IP address of the HoloLens first. (On HoloLens: Settings/Network & Internet/Hardware Properties/IPv4 address).

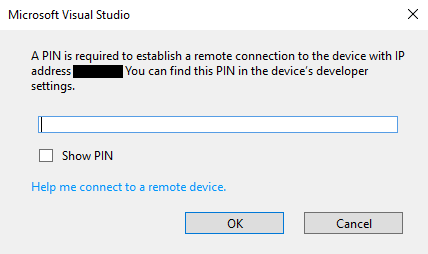
Settings/Update/For developers).Remote Machine or Device to deploy and run the application on the HoloLens.If this is the first deployment for HoloLens on your computer, you will be asked to pair the devices. Find the required PIN on your HoloLens in Settings/Update&Security/For developers.
Once the HoloLens application starts, you will be asked for permission to use the microphone and webcam. This is mandatory for tracking and the use of voice commands. Airtap Yes to confirm the dialog. Now gaze at your model to initialize tracking. To simply check what might cause tracking issues, use the voice command Show Debug Image. This will let you will see a debug image that is moving together with your head movement, showing the camera image and the tracking line model. Turn it off again by saying Hide Debug Image to save performance.
Please consider to improve initialization and re-initialization speed by using the Read/Write Data commands below. To understand the process behind them, have a look at Initialization: Fast Init & Re-initialization.
The HoloLens example scenes include some simple commands that you can invoke with your voice or a connected bluetooth keyboard. Please note that voice commands only work, if your HoloLens has an internet connection.
You can change or extend the list by editing the GameObjects SpeechInput and KeyboardHandler, which you can find under the Input GameObject in the hierarchy. All commands available by default can be found in the table below.
| Voice Command | Key | Description |
|---|---|---|
| Reset Soft | S | Resets the tracking to the init pose |
| Reset Hard | H | Resets the tracking to the init pose and deletes all saved templates |
| Pause Tracking | P | Stops the tracking, also freezes the debug image |
| Resume Tracking | R | Resumes tracking and unfreezes the debug image |
| Show Debug Image | D | Makes the debug image visible |
| Hide Debug Image | F | Makes the debug image invisible |
| Wide Field of View | M | Use the full field of view for tracking. Helpful for tracking targets of large size. |
| Narrow Field of View | N | Use a narrowed field of view for tracking. Helpful for tracking targets of small size. |
| Read Data | I | Reads and applies saved tracking templates |
| Write Data | W | Stores dynamically collected tracking templates for later use |
| Constrain to Plane | C | Constrains the tracking to poses parallel to the floor. Helpful if the tracking target is located on a level surface. |
| Disable Constraint | V | Disables the plane constrain from above. |
For the HoloLensPosterTracking scene, only the first four commands apply.
With the trial license you can only start an application up to five times after successful deployment. Afterwards, it no longer works together with the vlSDK. Then, you will need modify your project and redeploy the application to the device.
You can overcome this technical restriction by purchasing a different license type. Please note that the trial license may only be used for evaluation purposes and does not permit application development.
When deploying on HoloLens with Visual Studio, updates are made instead of a complete reinstallation of the app, which might cause the deployment counter not to be reset correctly. If you still experience licence errors, try to uninstall the app on the HoloLens manually before deploying, or enable the option Uninstall and then re-install my package in Visual Studio Project/Properties/Debug.
Once an application has been deployed to the HoloLens, finding the origin of a problem can be difficult. The vlSDK log messages could possibly give you a hint in the right direction. To see the log messages, you can start the application on the HoloLens with the Visual Studio debugger. The messages will then be shown in the Visual Studio "Output" window. To be able to see the log messages while deploying with IL2CPP, you need to enable ScriptDebugging in the Unity Build Settings and deploy the build via Visual Studio as Debug.
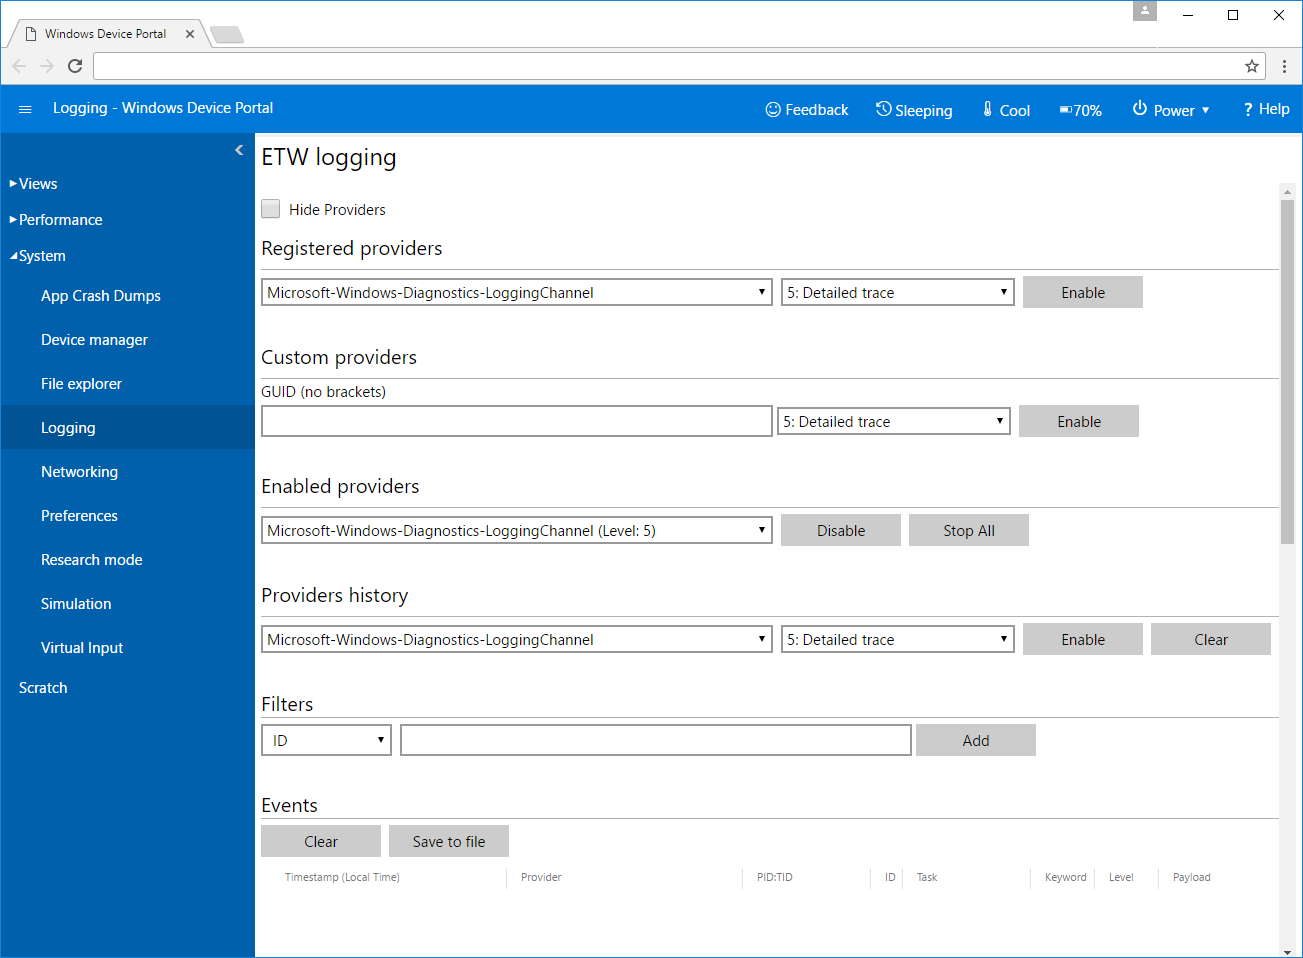
Alternatively, you can see the log messages in the HoloLens Web Portal under "Logging". In order to activate it, you must select the "Microsoft-Windows-Diagnostics-LoggingChannel" provider. The log messages of the vlSDK will then appear in the "Events" section.
Many users have noticed, that it is not possible to have a live preview of the HoloLens in the HoloLens web portal while using the vlSDK. This is due to the exclusive camera access of the web portals live preview. But taking pictures or recording videos does work.
An alternative to the web portal was introduced with the October Update 2018 (version 1809): It allows connection to a Miracast device (also at least version 1809) and thus streaming of the camera image with displayed virtual content. To enable the streaming onto a Miracast device, you first have to start your application. Inside this application, use the bloom gesture to switch to an intermediate menu.
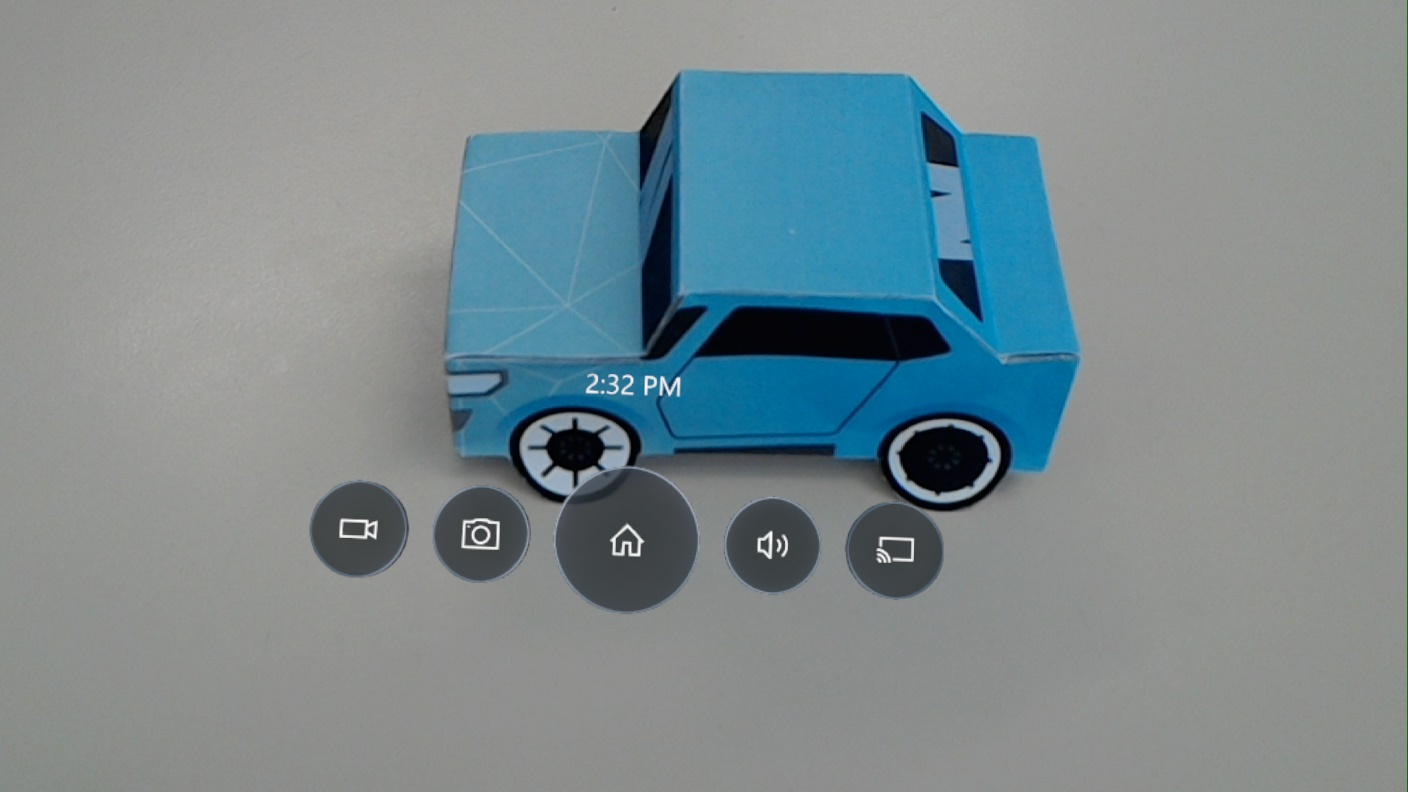
The button on the right opens a sub-menu for establishing the connection to a miracast device. Immediately after you have selected your device in this list, streaming will start.
Important: You should stop your connection before starting the application. Even if you leave the application via bloom gesture (and selecting home), you should stop the miracast connection. Otherwise there will be two processes competing for the camera and the miracast connection will be corrupted. Then only a restart of the HoloLens can still resolve this problem.