
documentation


Providing stable tracking while maintaining smooth performance on HoloLens can be tricky. This page will show you some settings to help you improve the VisionLib tracking on HoloLens.
Always keep an eye on the polygon count of your 3D models and use Mixed-Reality-friendly shaders. Since Unity version 2019.2, you can also set the build architecture for UWP apps to ARM64 to increase performance for HoloLens 2.
Further improvements can be achieved by the following VisionLib settings:
With HoloLens 2, the field of view of its world-facing camera was greatly increased compared to the first version. The object that your are looking at will now appear smaller in the captured camera image than in your actual view. This leads to a decreased initialization distance and forces the user to step closer to the object when working with a small target, but at the same time reduces the necessary distance to start tracking for large objects.
In short, it will improve initialization of large tracking targets while the initialization on small objects can get worse. That's why VisionLib (since version 20.6.1) provides a parameter called fieldOfView with the possible values wide (default) and narrow to control this behaviour.
You can set it in the tracking configuration in the input section like seen below:
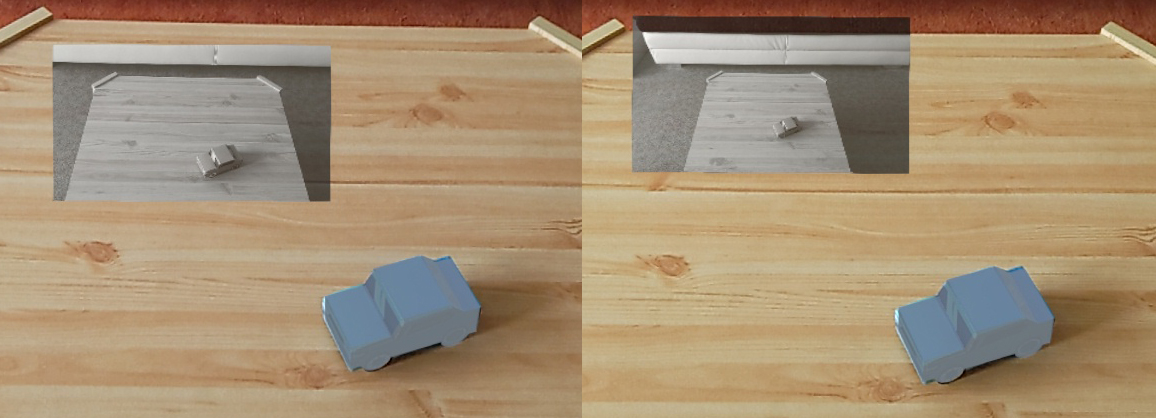
Our HoloLens example scenes also provide voice commands which help you to find out which setting fits best for you tracking target. E.g. within the HoloLensSimpleModelTracking scene, say Show Debug Image and toggle the field of view by using the commands Wide Field of View and Narrow Field of View. Move to your desired initialization spot. If your tracking target is still completely visible inside the debug image while using the narrow field of view (like it is the case with our paper car), you should set "fieldOfView": "narrow" inside your tracking configuration. If not, use "fieldOfView": "wide".
See the difference in the debug image of the captured images below (left: narrow field of view, right: wide field of view):
This way, you can improve the tracking initialization on HoloLens 2 significantly. On HoloLens 1, this feature is not needed and will have no visible effect.
For debugging purposes, it can be helpful to enable the line model by setting "showLineModel": true inside your tracking configuration. Be aware that drawing the line model will have a negative effect on the performance. We recommend to disable it again after debugging, or connect the enabling and disabling of showLineModel to the voice command Show/Hide Debug Image, like it is the case in our HoloLens example scenes.
If you ever increased the debug level inside your tracking configuration for debugging purposes, don't forget to revert this change before your final deploy, as it will also effect the performance negatively.
Processing color-images is more expensive than processing grey-images. So as long it is possible within your setting, we recommend to set "useColor": false in the input section and in the parameters section of the model- or poster-tracker. Only set this to true, if your tracking target is otherwise not recognizable.
When using AutoInit on HoloLens, be especially aware of the used pose amount (which depends on the set detail level or step count of you defined origin and destination geometry).
Check the exact count in the helpbox of your VLWorkSpace GameObject. A high amount of poses will effect the performance negatively and can therefore lead to a slower initialization. So keep in mind to set up only those initialization areas that are actually needed and keep the detail level low.
E.g. if your object is always only visible from its front, avoid the use of a half sphere and adjust the origin geometry's angle length parameters to fit the initialization area instead.
You can make further adjustments on the HoloLens camera input via the configuration parameters described below. However, those are advanced parameters that do not need to be adjusted in most cases and require some deeper understanding of the image acquisition in order to use them effectively.
All parameters which are valid for the generic Model Tracker are also valid for the HoloLens tracker. The camera input of the HoloLens can be additionally adjusted by the following parameters:
| Parameter | Type | Default value | Example |
|---|---|---|---|
| undistort | bool | false | "undistort": true |
|
This flag defines whether the HoloLens camera image should be undistorted before further processing. As the HoloLens internal calibration comes with radial distortion parameters, this value should always be set to | |||
| framerate | int | 30 | "framerate": 30 |
|
This value defines the framerate of the HoloLens image acquisition. Valid values are 30, 15, and 5. Decreasing this value might improve the performance of other concurrent operations, but is not recommended as it will have negative impact on the tracking quality. | |||
| SmartDownsamplingDisabled | bool | false | "SmartDownsamplingDisabled": true |
|
VisionLib might decide to downsample the camera image on certain processes. This leads to a more performant user experience on the costs of tracking quality. In order to force VisionLib to NOT allow downsampling on the tracking pipeline, you can set this parameter to true in the input section. | |||
| cameramode | int | 0 | "cameramode": 3 |
|
This value defines the camera mode of the HoloLens image acquisition. Valid camera modes are: HoloLens 1: 0: 1280x720, 45 deg FOV 1: not supported 2: 1408x792, 48 deg FOV 3: 1344x756, 67 deg FOV 4: 896x504, 48 deg FOV
HoloLens 2: 0: 1504x846, 64.69 deg FOV 1: not supported 2: 1952x1100, 64.69 deg FOV 3: 1280x720, 64.69 deg FOV 4: 960x540, 64.69 deg FOV 5: 2272x1278, 64.69 deg FOV 6: 424x240, 64.69 deg FOV
For most use cases, the default cameraMode is working fine. A mode with a higher resolution can be used if the tracking quality should be increased while the robustness and performance of the tracking is less relevant. In reverse, a lower resolution can be used when the tracking speed is more important than its accuracy. (only use low resolution together with On HoloLens 1, using cameraMode 3 can be useful when working with a large tracking target. | |||
These parameters may change in future releases.