
documentation


The ModelTrackingSetup scene is meant as a tool to optimize the tracking parameters for your custom model. It also allows you to troubleshoot tracking or initialization challenges with your model.
For these purposes, the scene offers a debug-view, along with UI elements enabling direct manipulation of tracking parameters and initialization data at runtime. Once a suitable setup is found, you can save it as a .vl configuration file directly from within the scene.
The debug view and options offered in the UI are covered individually in the following.
Disclaimer: You should not derive your own development scene from ModelTrackingSetup: The debug functionality available in this scene comes with a performance penalty. It is not designed or optimized for deployment.
The intended use case is to temporarily set up your model in the ModelTrackingSetup scene, set the desired initial pose, tweak the relevant tracking parameters and finally export a configuration file for use in your separate development scene.
The typical workflow for creating a custom configuration in this manner is outlined in the following:
Changing the Model in the Unity Quick Start Guide:SceneContent in the hierarchy.VLMiniCar in the SceneContent.StreamingAssets folder. E.g. into a new subfolder like StreamingAssets/MyModel.ModelTrackingSetupConfiguration.vl by replacing the `modelURI` parameter with the path to your model. Using the example path from above, the new path would be: streaming-assets-dir:MyModel/filename.type. ModelTrackingSetupConfiguration.vl is located in StreamingAssets/VisionLib/Examples/ModelTracking)ModelTrackingSetupConfiguration.vl to the unit of length used in your model file.Saving the Current Tracking Settings in a Configuration File below for instructions).GameObject containing your model in the hierarchy. This snaps the scene view to the model regardless of its location and size.VLInitCamera under VLTracking in the hierarchy by single clicking it. An inset camera preview window becomes visible in the bottom right of the scene view.Align with view button on the VLInitCamera component. This snaps the selected VLInitCamera to the view you are seeing.VLInitCamera again. Repeat this until the result is satisfactory.Scene Controls below. In advanced use-cases you might also want to record additional initialization data along the way. How this works is explained in the section Reading/Writing/Resetting the Initialization Data below.Save Configuration.Saving the Current Tracking Settings in a Configuration File below for path settings.StreamingAssets folder of your project. Ensure the modelURI parameter in the configuration file is correct if you are using a relative URI. In the simplest case, place the model in the same folder as the configuration file and use the project-dir: scheme (see File Access).Reading/Writing/Resetting the Initialization Data below for path settings.StreamingAssets folder of your project. Add the parameter initDataURI to your configuration if it does not exist yet. Point this parameter to your init data file. In the simplest case, place the init data file in the same folder as the configuration file and use the project-dir: scheme (see File Access).Congratulations! At this point your have successfully set up a new project with your custom tracking model and bespoke tracking parameters.
This section covers the purpose of the controls available in the ModelTrackingSetup scene, all of which are shown in the overview image here:
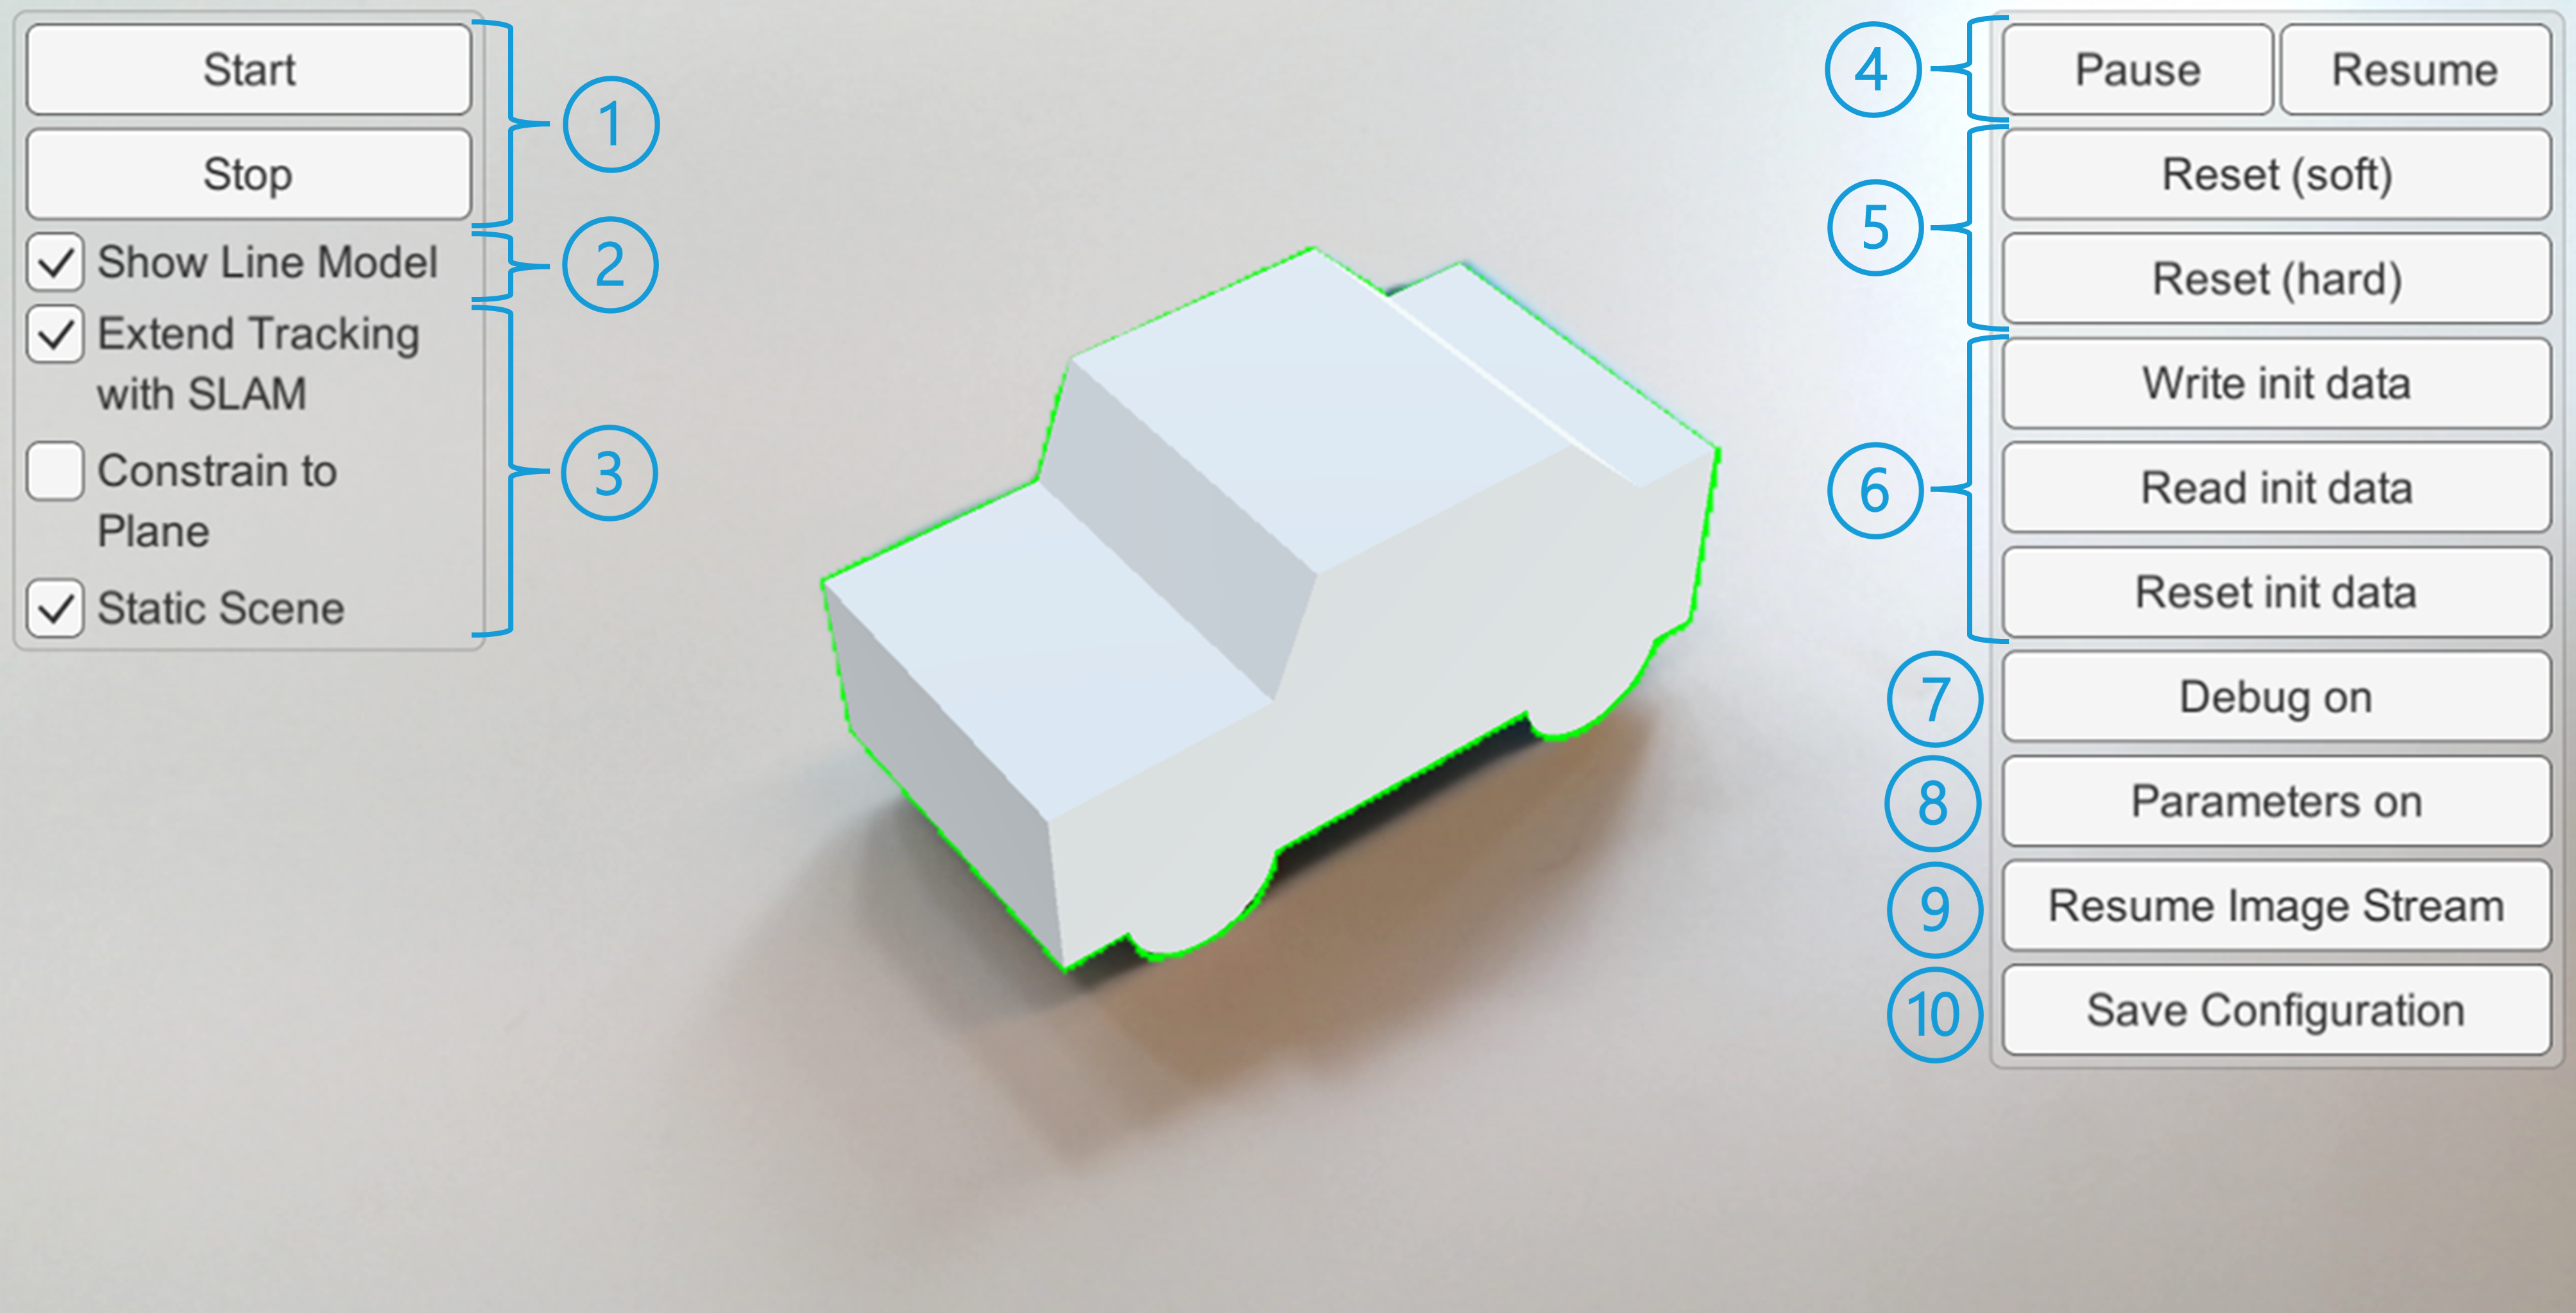
Legend:
The Start button sets up a new tracking context as specified in the configuration file and starts tracking. A tracking context contains the tracker itself and any tracking data generated since start was last pressed. If tracking is already running, pressing Start again discards the current context and loads a fresh one. The Stop button ends tracking, unloads and tears down the current tracking context. These buttons are located at the top left of the scene (see (1) in the overview image above).
When tracking is running, the sequence Stop > Start is the most complete tracking reset option. With regard to tracking, it is equivalent to restarting the Unity Scene entirely.
The Pause button halts tracking and image acquisition. The Resume button resumes both. These buttons are located at the top right of the scene (see (4) in the overview image above).
Checking Extend Tracking with SLAM enables the use of external SLAM on devices offering this feature (see External SLAM (ARKit/ARCore) Support for details). This is relevant during rapid or erratic camera movement, as well as when the tracked object is lost from the camera's field of view. If available on the device, enabling SLAM will prevent loss of tracking in these cases — or at least significantly improve tracking reacquisition. This allows the model-based tracking to pick up again automatically after the tracked object re-enters the field of view or when excessive movement subsides.
The option Constrain to Plane "glues" the tracking model to a plane defined by a normal (up) vector. This removes two rotational degrees of freedom, only allowing rotations of the model around the plane's up vector, which can improve performance. This mode is intended only for use cases where the tracked object is set on a flat surface and remains there during tracking. Note: this only works if the flat surface is level and NOT tilted with respect to the environment. For additional documentation of the plane constrained mode, refer to Model Tracker. The plane constrained mode parameters can be customized under under VLTracking > VLPlaneConstrainedMode in the hierarchy.
The Static Scene mode can be used if the tracked objects are not expected to move at all. SLAM and model-based tracking are decoupled in this mode. This allows for a high tracking pose update frequency by pushing through lower accuracy SLAM poses directly and regularly applying high accuracy pose corrections using VisionLib's model-based tracking (each time a new model tracking result becomes available). In effect, the high update frequency makes the application feel smoother.
The checkboxes controlling Extend Tracking with SLAM, Constrain to Plane and Static Scene are located underneath the Show Line Model checkbox at the top left of the screen (see (3) in the overview image above). Note that changes to these settings only take effect after tracking is restarted. Constrain to Plane and Static Scene only become available if Extend Tracking with SLAM is enabled. All these options fully rely on SLAM being available and hence only work on devices offering external SLAM. On other devices, these settings have no effect.
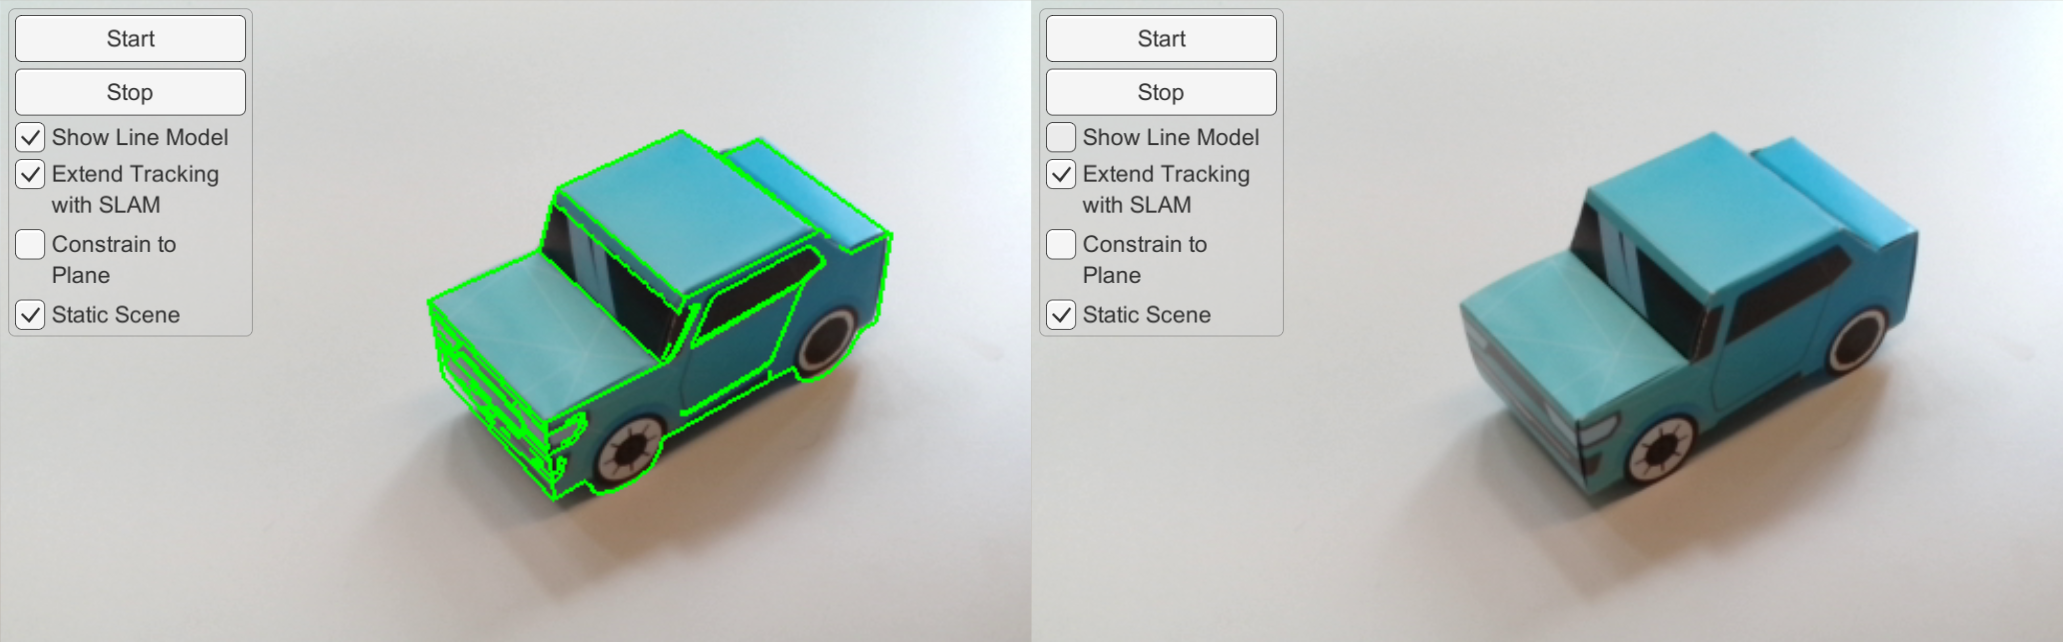
The current tracking line model is displayed by default. It is usually hidden under the rendered augmentation of the tracked model. To make the line model fully visible, disable the model's mesh renderer in the hierarchy.
The line model itself can be toggled on and off using the checkbox reading Show Line Model in left button panel ((2) in the overview image):
The Reset Soft button resets tracking and returns to initialization mode. In other words, the currently tracked pose is dropped and the tracking state switches to lost. In some cases VisionLib is able to re-initialize very quickly after a soft reset. The Reset Hard button additionally deletes the dynamic initialization data recorded in the current session. For details on the init data, refer to Initialization: Fast Init & Re-initialization.
The reset buttons are located at the top right of the scene (see (5) in the overview image above).
The Read-, Write- and Reset init data buttons (see (6) in the overview image above) are located underneath the two reset buttons. The functionality of these buttons is explained in Initialization: Fast Init & Re-initialization.
As a short summary:
Read init data reads saved init data from a file into the static init data storage. By default this file's URI is local-storage-dir:/VisionLib/initData.binz. You can replace this with a custom URI in the hierarchy under Canvas > RightButtonPanel > ReadInitData > Button > On Click().Write init data moves the current dynamic init data into the static init data container and then saves the combined init data in a file. Note that since the formerly dynamic init data has become static it is now protected from Reset Hard and can only be reset with Reset init data. By default the target file's URI is local-storage-dir:/VisionLib/initData.binz. You can replace this with a custom URI in the hierarchy under Canvas > RightButtonPanel > WriteInitData > Button > On Click().Reset init data clears both the dynamic and the static init data containers. This implicitly also happens if you press Start while tracking is running or if your restart tracking using Stop > Start.Again, for more details on working with init data, refer to Initialization: Fast Init & Re-initialization.
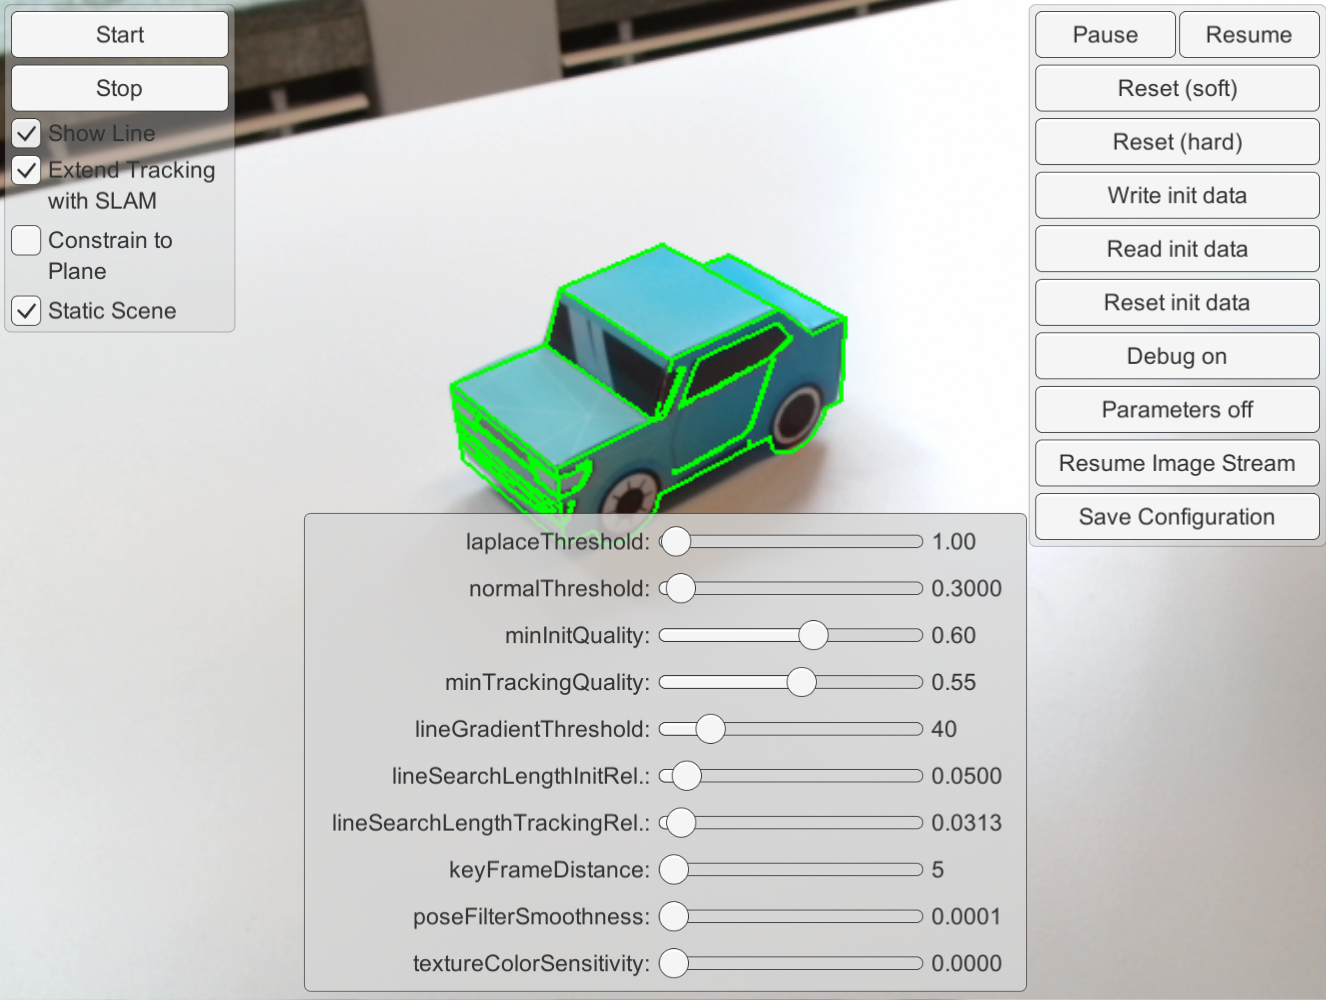
The Debug on/off button (see (8) in the overview image above) toggles the debug view. This mode shows the grayscale image on which tracking is performed. The line model and search lines are overlaid on top.

In combination with the parameter panel, this view can help you tweak different aspects of the tracking, including:
To learn how to use the sliders in the parameter panel to achieve these goals, familiarize yourself with the pertinent tracking parameters.
A more complete overview over debugging with VisionLib is provided in the Debugging Options page.
The Parameters on/off button (see (8) in the overview image above) toggles the parameter panel. This panel is shown in the image below. It allows you to change the values of a range of tracking parameters during tracking and observe the effects.
While the panel can also be used outside the debug view, the effects of parameter changes are most easily observed in debug view.
The Pause Image Stream button (see (9) in the overview image above) stops forwarding images to the tracker. Tracking is repeated indefinitely on the last frame sent to the tracker. This can be used to observe the effect of tracking parameter modifications on the tracking from a given view of the model. This lends itself to use in combination with the debug view and the parameter panel.
This feature also allows efficient initial pose setup using the following method:
VLTracking > VLInitCamera in the hierarchy) until tracking snaps on to your model.The Save Configuration button (see (10) in the overview image above) saves the current tracking parameters and init pose for the tracker into a .vl configuration file. Note that the current pose of the InitCam in the scene (VLTracking > VLInitCamera) is used as the init pose in this new file.
To make use of it in your development scene, select the VLInitCamera game object from the Hierarchy there, and enable Use Pose From Tracking Config option.
By default this file's URI is local-storage-dir:VisionLib/SavedTrackingConfiguration.vl. A custom URI can be set via Save Configuration URI in the hierarchy on Model Tracker Parameters on VLTracking > VLModelTracker. VisionLib file schemes (see File Access) are supported for this URI. Note that writing to the assets directory may not be possible on some platforms.