documentation

AR Foundation Remote Plugin Setup
Level: Advanced

This guide walks you through the steps needed to set up a VisionLib AR Foundation project for use with the debugging plugin AR Foundation Remote.

The setup procedures given here start with an empty project in Unity and result in the ability to successfully track our mini car example object using the AR Foundation example scene. Tracking works both in the editor, using the AR Foundation Remote's companion app, as well as in the final standalone application after building and deploying it to the target device.

Contents

  • Unity 2020 (Android/iOS)
    • Setting Up VisionLib With Its AR Foundation Extension
    • Installing and Configuring the AR Foundation Remote

Unity 2020 (Android/iOS)

These setup instructions work for both major Versions of the AR Foundation Remote (1.x and 2.x). They were confirmed in Unity 2020.3 LTS starting with AR Foundation Remote 1.4.21-release.2.

Setting Up VisionLib With Its AR Foundation Extension

  • Create an empty project in Unity 2020.3 LTS.
  • Follow the steps given for Unity 2020 and your target platform in AR Foundation Support. The following checklist is a simplified overview of these steps:
    • Install the VisionLib SDK and VisionLib SDK - ARFoundation packages, followed by the ARFoundation Examples.
    • Add your license file.
    • Apply the appropriate build settings for your platform in your project's player settings.
  • Recommended sanity check:
    • Build the ARFoundationModelTracking example scene and deploy the application to your target device.
    • Start the application. Start Tracking and ensure the mini car is tracked.
    • If this fails or if the the build fails, fix the underlying issues first (i.e. before moving on to installing the AR Foundation Remote plugin).
  • You may want to make a backup copy of your project folder in this state. The AR Foundation Remote installation process is straightforward and stable, but a backup is still recommended.

Installing and Configuring the AR Foundation Remote

  • In the package manager, switch to Packages: My Assets. Locate ARFoundation Editor Remote or ARFoundation Remote 2.0 – depending on which one you purchased. Download the package, then import it.
  • In the project window under Assets > Plugins > ARFoundationRemoteInstaller locate Documentation.md. Execute the following parts of the setup instructions therein:
    • From Installation do steps 5 & 6. Disregard step 5 if you are not using a version control system.
    • Note: There is no need to Embed AR Foundation and apply fixes unless explicitly asked to do so.
    • From How to use do all steps until you are told to test the setup with a scene.
      • In step 1: You already switched the build target. Disregard this part.
  • Test the entire setup with VisionLib + AR Foundation + AR Foundation Remote:
    • Set the player resolution in the editor to your target device's native screen resolution (in the Aspect dropdown in the game view control bar). Create a new setting with your custom resolution if your device's resolution is not already available. This ensures that the streamed player view in the AR Foundation Remote companion app looks correct.
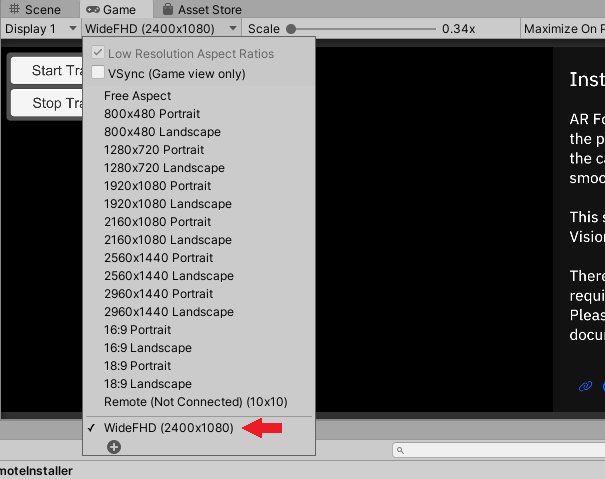
      ARFoundationRemote-custom_resolution.png
    • Run your scene with the play button in the editor.
      • If you encounter any errors here, look for a part of the error message asking you to Embed AR Foundation and apply fixes in the AR Foundation Remote installer. If asked, do this, then retry running the scene with the play button.
  • You should now be able to run our AR Foundation Example scene in the editor while using your Android or iOS device to sense the environment. Press the Start Tracking-Button on the device and ensure the VL car is tracked.