
documentation


This section covers the purpose of the controls available in the ModelTrackingSetup scene, all of which are shown in the overview image here:
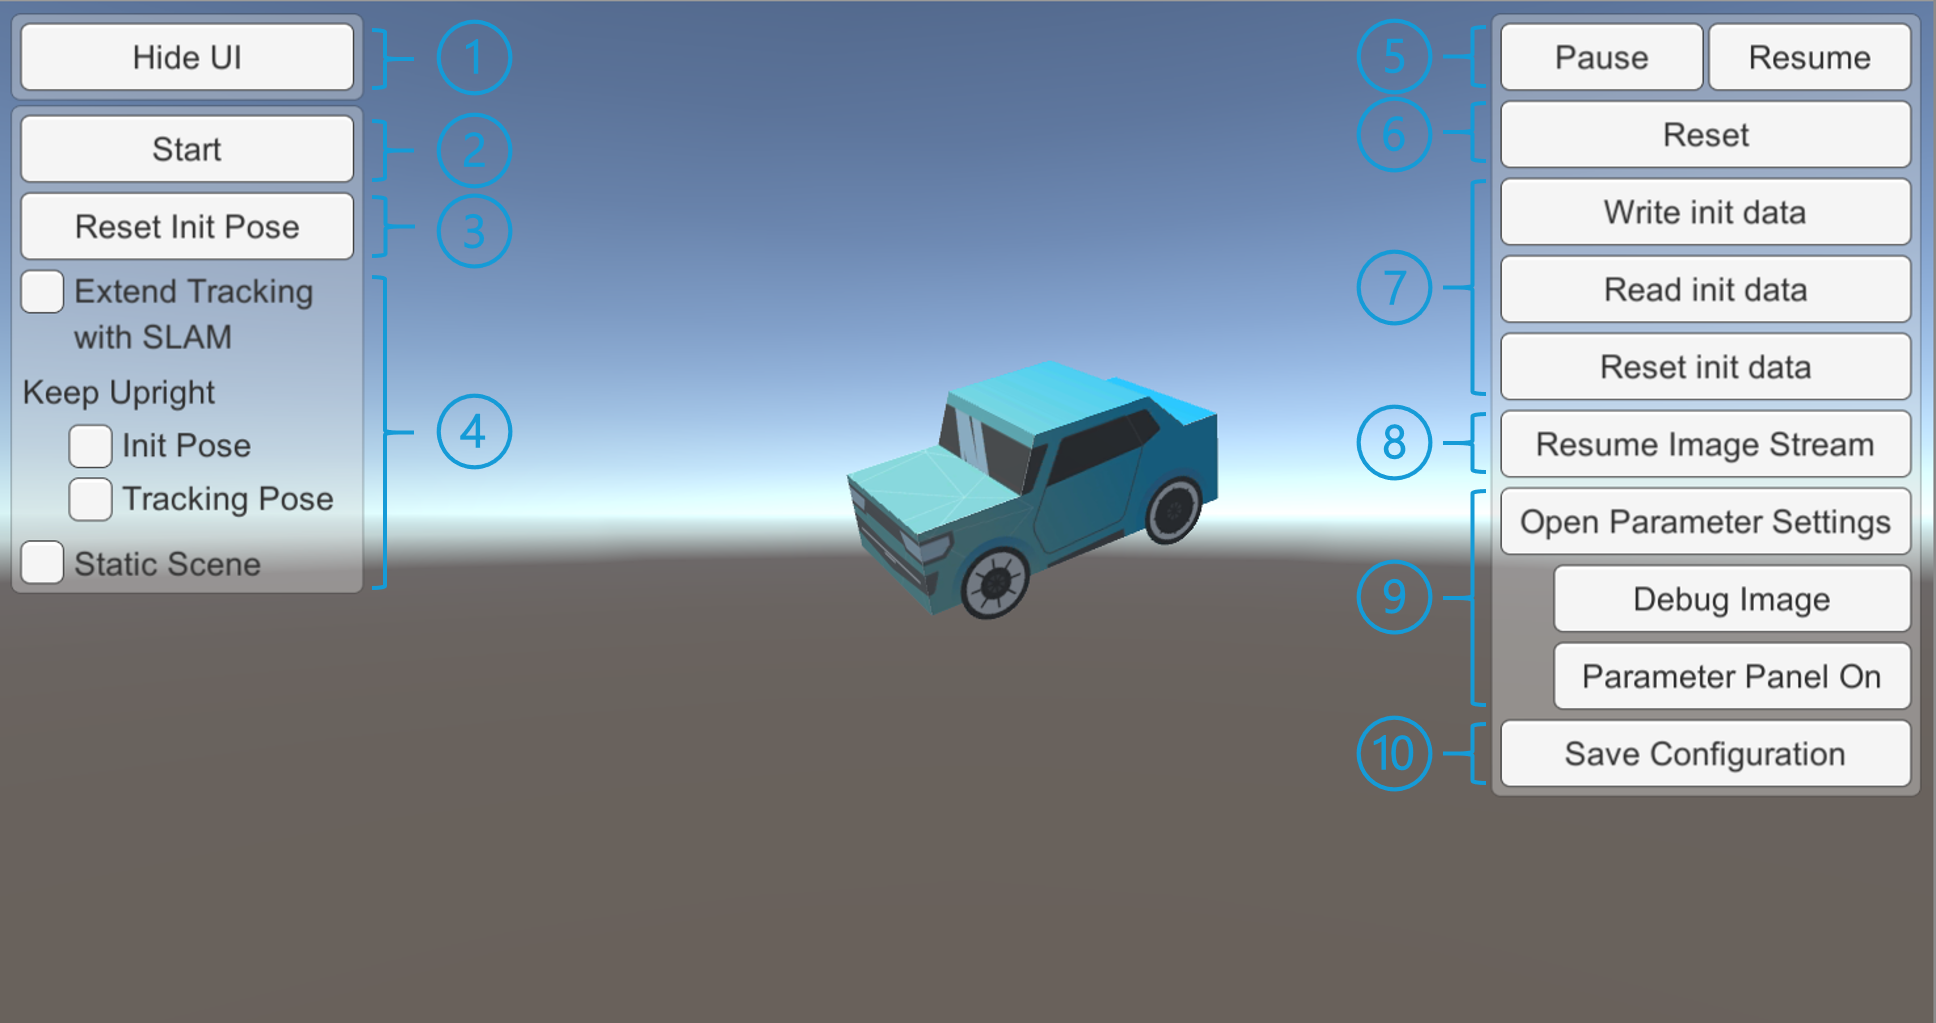
Using the InitPoseInteraction (see Setting an Init Pose) sometimes conflicts with UI elements. The Hide UI button hides all UI elements currently present in the scene, so the interaction isn't blocked by these elements. After adjusting the initial pose, the UI elements can be displayed again, pressing the Show UI button. These buttons are located at the top left of the scene (see ① in the overview image above).
The Start button sets up a new tracking context as specified in the configuration file and starts tracking. A tracking context contains the tracker itself and any tracking data generated since start was last pressed. If tracking is already running, pressing Start again discards the current context and loads a fresh one. The Stop button ends tracking, unloads and tears down the current tracking context. These buttons are located at the top left of the scene (see ② in the overview image above).
When tracking is running, the sequence Stop > Start is the most complete tracking reset option. With regard to tracking, it is equivalent to restarting the Unity Scene entirely.
Interacting with the model via tha GameObjectPoseInteraction (see Setting an Init Pose) might sometimes result in an undesired pose. When starting the application, the Pose of the TrackingAnchor is stored in the GameObjectPoseInteraction. Pressing the Reset Init Pose button will reset the pose of the TrackingAnchor to this original pose. These buttons are located at the top left of the scene (see ③ in the overview image above).
Checking Extend Tracking with SLAM enables the use of external SLAM on devices offering this feature (see External SLAM (ARKit/ARCore) Support for details). This is relevant during rapid or erratic camera movement, as well as when the tracked object is lost from the camera's field of view. If available on the device, enabling SLAM will prevent loss of tracking in these cases — or at least significantly improve tracking reacquisition. This allows the model-based tracking to pick up again automatically after the tracked object re-enters the field of view or when excessive movement subsides.
The options located below Keep Upright "glue" the tracking model to a plane defined by a normal (up) vector. This removes two rotational degrees of freedom, only allowing rotations of the model around the plane's up vector, which can improve performance. The InitPose option only "glues" the model during initialization while the Tracking Pose option modifies the tracking result.
This mode is intended only for use cases where the tracked object is set on a flat surface. Note: This only works if the flat surface is level and NOT tilted with respect to the environment. For additional documentation of the Keep Upright/Tracking Pose (plane constrained mode), refer to Model Tracker. The plane constrained mode parameters can be customized under under SceneContent > VLTrackingAnchor in the hierarchy. The Keep Upright/Init Pose parameters can be adjusted in the corresponding TrackingAnchor.
The Static Scene mode can be used if the tracked objects are not expected to move at all. SLAM and model-based tracking are decoupled in this mode. This allows for a high tracking pose update frequency by pushing through lower accuracy SLAM poses directly and regularly applying high accuracy pose corrections using VisionLib's model-based tracking (each time a new model tracking result becomes available). In effect, the high update frequency makes the application feel smoother.
The checkboxes controlling Extend Tracking with SLAM, Keep Upright and Static Scene are located at the top left of the screen (see ③ in the overview image above). Note that changes to these settings only take effect after tracking is restarted. Keep Upright and Static Scene only become available if Extend Tracking with SLAM is enabled. All these options fully rely on SLAM being available and hence only work on devices offering external SLAM. On other devices, these settings have no effect.
The Pause button halts tracking and image acquisition. The Resume button resumes both. These buttons are located at the top right of the scene (see ⑤ in the overview image above).
The Reset button resets tracking and returns to initialization mode. In other words, the currently tracked pose is dropped and the tracking state switches to lost. Additionally, it deletes the dynamic initialization data recorded in the current session. For details on the init data, refer to Initialization: Fast Init & Re-initialization.
The reset button is located at the top right of the scene (see ⑥ in the overview image above).
The Read-, Write- and Reset init data buttons (see ⑦ in the overview image above) are located underneath the two reset buttons. The functionality of these buttons is explained in Initialization: Fast Init & Re-initialization.
As a short summary:
Read init data reads saved init data from a file into the static init data storage. By default this file's URI is local-storage-dir:/VisionLib/initData.binz. You can replace this with a custom URI in the hierarchy under Canvas > RightButtonPanel > ReadInitData > Button > On Click().Write init data moves the current dynamic init data into the static init data container and then saves the combined init data in a file. Note that since the formerly dynamic init data has become static it is now protected from Reset and can only be reset with Reset init data. By default the target file's URI is local-storage-dir:/VisionLib/initData.binz. You can replace this with a custom URI in the hierarchy under Canvas > RightButtonPanel > WriteInitData > Button > On Click().Reset init data clears both the dynamic and the static init data containers. This implicitly also happens if you restart tracking using Stop > Start.Again, for more details on working with init data, refer to Initialization: Fast Init & Re-initialization.
The Pause Image Stream button (see ⑧ in the overview image above) stops forwarding images to the tracker. Tracking is repeated indefinitely on the last frame sent to the tracker. This can be used to observe the effect of tracking parameter modifications on the tracking from a given view of the model. This lends itself to use in combination with the debug view and the parameter panel.
The Open Parameter Settings (see ⑨ in the overview image above) toggles the debug mode. During this mode, the line model will be visible and it is not possible to save the current tracking configuration. Additionally, two additional options can be selected.
Pressing the Debug Image button will switch the background image from the color image to the grayscale debug image. The line model and search lines are overlaid on top of this image.

In combination with the parameter panel, this view can help you tweak different aspects of the tracking, including:
To learn how to use the sliders in the parameter panel to achieve these goals, familiarize yourself with the pertinent tracking parameters.
A more complete overview over debugging with VisionLib is provided in the Debugging Options page.
The Parameter Panel on/off button toggles the parameter panel. This panel is shown in the image below. It allows you to change the values of a range of tracking parameters during tracking and observe the effects.

The Save Configuration button (see ⑩ in the overview image above) saves the current tracking parameters and init pose for the tracker into a .vl configuration file.
By default this file's URI is local-storage-dir:VisionLib/SavedTrackingConfiguration.vl. A custom URI can be set via Save Configuration URI on the VLTracking > VLModelTracker > VLModelTrackerParameters GameObject. VisionLib file schemes (see File Access) are supported for this URI. Note that writing to the assets directory may not be possible on some platforms.
To use the saved configuration file, add the InitPoseFromTrackingConfig component to a TrackingAnchor GameObject.